


Related Articles
DIY Chalk Paint Rustic Americana Flag: Independence Day Décor
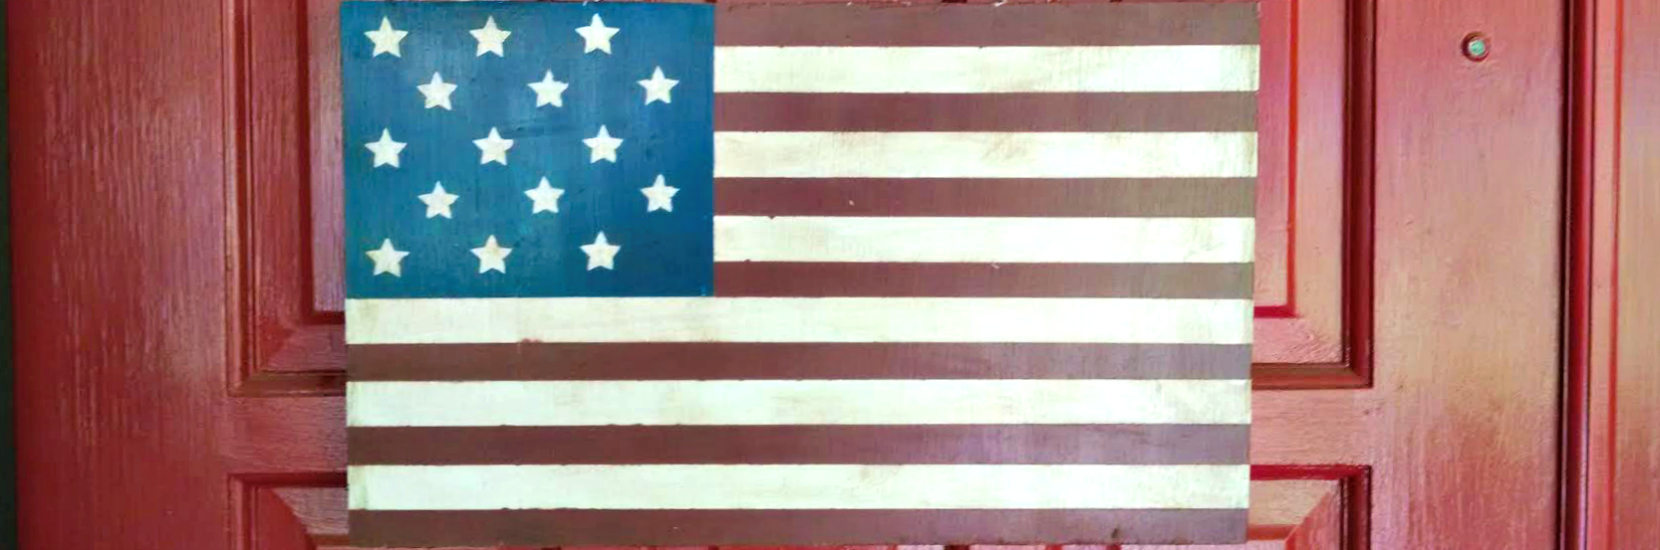
Get patriotic for the 4th of July with this DIY American flag using chalk paint and a few other easy supplies courtesy of Stacie Connerty of The Divine Miss Mommy.
The 4th of July is quickly approaching and of course, we want to celebrate. Having painted our door red earlier this year, I wanted something that would pop and look amazing on my front door and we definitely found it with this craft.
We used our beloved Chalk Paint and a $1 board from our local home improvement store plus a little string from our pantry (the kind that you tie turkey with) to complete this project. It took a little longer than usual because it is exceptionally humid here in Atlanta so make certain to allow a few days for this project if you hope to have it ready for July 4th.
SUPPLIES NEEDED:
- Board
- String or Twine
- Painter’s Tape
- Dust free rags
- Chalk Paint
- Stencil
- Paint Brushes
- Eyelet Hooks
ONE
Gather your materials. You will need a proper Chalk Paint brush to use with your Chalk Paint or you won’t get the finish you see on our flag. You also need painters tape to make your stripes and the box for stars. We also grabbed a star stencil out of our kids art cart.
Here are the Chalk Paint items we used for this project:
- Chalk Paint in Greek Blue – 1 Litre Pot (this is the tester size)
- Chalk Paint in Pure (white) – 1 Quart
- Chalk Paint in Emperor’s Silk (red) – 1 Quart
- Pure Bristle Brush – Medium
Now please know that you will not use all of this paint. These are the sizes that I had on hand. You will actually use very little paint on this project and that is one of the things that we love about Chalk Paint.
TWO
Paint your board using Pure (white). Make certain to thoroughly coat the board and the sides because they will definitely show. Although you can still see the grain of the wood, this is what your board should look like:
Allow your board to dry completely.
THREE
Tape off your box for the stars. You will be painting this blue. We did not measure but eyeballed it.
Paint the box with your Greek Blue Chalk Paint. Make sure that this coat is thick so you do not see the white underneath.
This will most likely need to dry overnight or placed in front of a fan for quicker drying.
FOUR
Once the blue has dried, tape out your stripes as pictured above. We eyeballed it and made our stripes as wide as the tape.
Next use your Emperor’s Silk Chalk Paint and paint over everything except the blue box for stars. Make certain to use enough paint to cover the white underneath.
FIVE
Gently peel off the tape. Go slowly so that the paint does not stick. Don’t worry about mistakes. That is the beauty of this project. It should look rustic rather than perfect. It is ok if the paint had bled a little or does not match up.
Look at our flag above. The mistakes are pretty evident. In the next few steps, we will show you how to cover those mistakes and create a great flag.
SIX
Now we add the stars. We had to play around with this a little. Not that this project only includes one board although we started with two. We tried stippling the stars with the paint chalk brush and it did not turn out well.
Instead, we cut out the star, held it down tightly and then painted each star one-by-one. Take your time and let each one dry or try not to touch the other stars.
We were eager to finish our project so we painted each star and then let them dry all at once.
SEVEN
Chalk Paint enthusiasts will know what comes next. The secret to a great chalk paint project is finishing it with the Soft Wax. For this project we used both types of wax. At this point we are using the dark wax to truly give that rustic look. The dark wax adds texture and age.
Don’t worry about how you put it on the board. Just use a dust free cloth and a small amount. Rub the wax in thoroughly. Use more wax for a darker look or less wax just to add traces of wax.
Let the wax dry for about 20 minutes and then rub off the extra wax in a circular motion. This is very similar to waxing a car.
If you want a darker look then use another coat of wax and let it dry for 20 minutes once again. We used one coat of dark wax.
EIGHT
Once you have rubbed the dark wax off, use the light wax to seal and finish your project.
Look how nice the flag looks; mistakes and all. It really does look like a rustic flag. Wipe it down once more with a dust free cloth.
NINE
Now you need to hang your piece of art. I would have preferred twine but I realized that all we had was string. I do like the way that it turned out. We added two eyelet hooks to the back of the board and then added the string for hanging.
Finally your project is complete and ready to be displayed. Look how great it looks on my front door.
Leave a comment below if you try this craft yourself or have any fun ways you celebrate the Fourth.